Fishink Stained Glass Project 4

My latest on the stained glass news is that it all survived the firing process and then Jane set to work making it into the final framed piece. Very kindly Jane has not only taken some great images and allowed us to view them but has explained the process as she has gone along. What a generous artist !
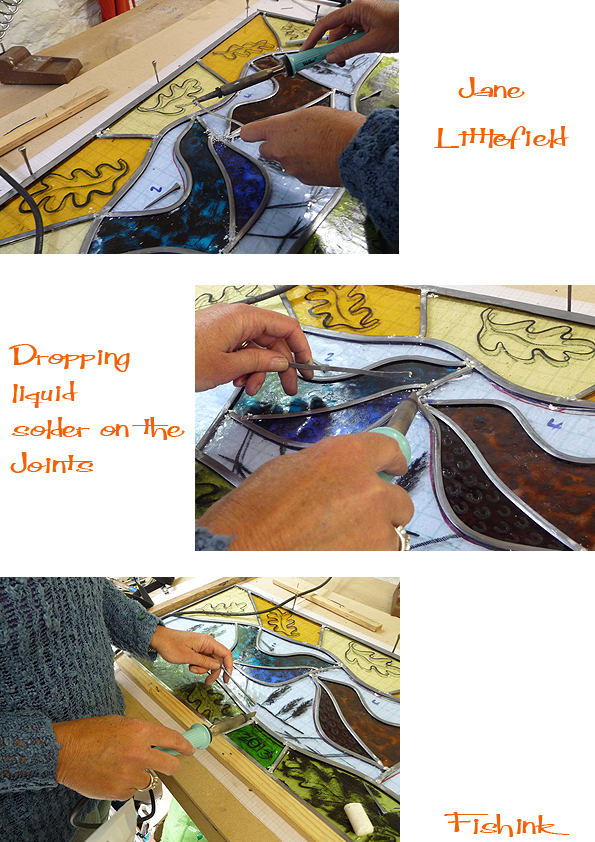
Jane constructed a right angle with wooden batons and then created the lead frame, building it up from the base upwards. The pins keep the glass pieces in place whilst the lead is placed and cut to fit.

The joints are then cleaned using a wire brush, which helps the solder (liquid metal) obtain a dust and dirt free area to adhere to. A Tallow Candle acts as a flux which aids the lead to reach a molten state. Using a soldering iron, Jane then carefully positions the molten solder onto the joints, helping to form a structure and to aid in the sealing of the panel.

More soldering and note that the pins help to keep the frames structure whilst the glass pieces and lead are being sealed into place.
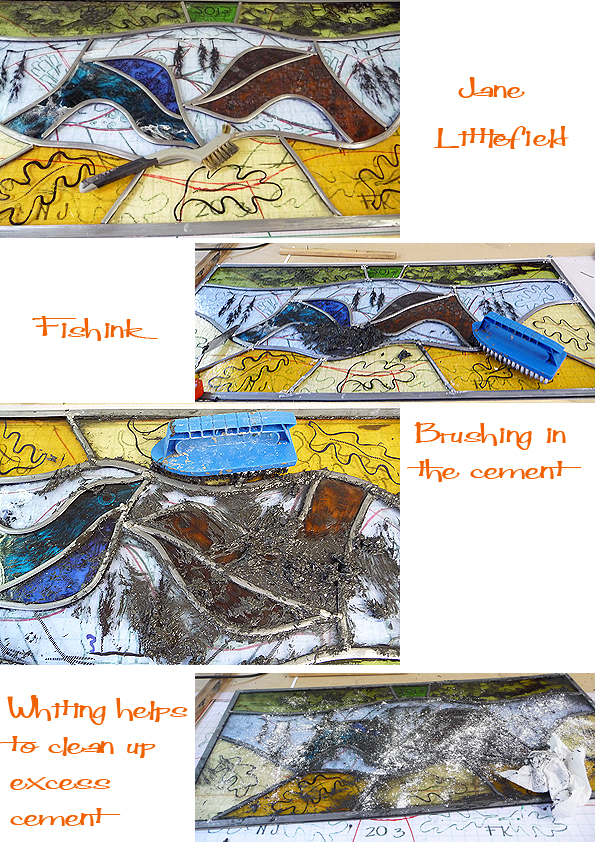
The panel is then flipped over and soldered on the back. After that stage Stained Glass Cement is brushed over the entire panel (both sides), especially under all the lead and gaps. This weatherproofs it and makes it sturdy. Once hardened, the excess cement needs to be cleaned off, Whiting is used to do this.
After giving the panel a good clean, and leaving the cement to dry off, the final stage is to give it a good polish. This Black Grate polish blackens the lead and also cleans the glass. Bringing the colours up to look fresh an sparkly.

Here’s Jane in her studio after all her hard work making my design into a finished piece. It looks amazing, I’m so pleased with how it’s turned out and I can’t wait to see it in front of me and get around to setting it into it’s final resting place. Thanks again Jane for your continued help and support. For kindly explaining your process and for giving us such fab images to see this, in all it’s ‘step-by-step’ glory. Catch up with Jane on her blog and see the whole photo story of the making of this panel here or in the previous blog posts on the Fishink Blog.

Just to mention for those of you in or around the Manchester area in the next few weeks that the BA (Hons) Illustration degree show is available to view at Manchester School of Art from the 15th til the 19th of June. Textiles, Fashion, Photography and more are on at the same time, more info here.


Gorgeous!! xxxx
Sent from my clever little phone
Thanks Lizbert x
Lively, lyrical, and beautiful!
Sent from my desktop pc!
Many thanks too. I like that you thought it lyrical ! : )
Hey wow, it looks wonderful. Those step-by-step pix took me back. Beautiful glass – was it fused to get the shapes & patterns? Looking forward to see it in situ. What does mister J think?
Thanks Juliet. Not sure if the glass was fused to be honest, I’ll have to check that out, I only saw it already in pieces and as a glass novice wouldn’t like to say lol Yep looking forward to seeing it myself, I should be picking it up tomorrow.
Looks a lot of hard work but a beautiful result, it will look lovely with the light shining through it, will we see it? Love Pat
Thanks guys. I promise to take some pics once it’s installed and also when the sun is shining to show you the effects. Thanks for your comments, I really enjoyed the process of designing and making this.
Good. I will be interested to see where you install this..it is charming.
Thanks again Dixie.
Who would have thought grate polish would clean the glass! Lovely and fascinating.